by alaskahome | Mar 17, 2026 | Uncategorized
Building a home in Alaska requires careful attention to structural design, and one of the most important considerations is how the roof handles heavy snow. Alaska’s long winters and significant snowfall mean that every home must be engineered to safely support snow accumulation. Understanding snow load roof design in Alaska is essential for homeowners planning to build a house that remains safe, durable, and efficient throughout the harsh winter months.
From roof pitch and framing strength to insulation and ventilation, multiple factors influence how well a roof performs in cold climates. Making informed design decisions early in the building process can prevent costly structural issues and ensure your home withstands Alaska’s demanding weather conditions.
What Is Snow Load and Why It Matters
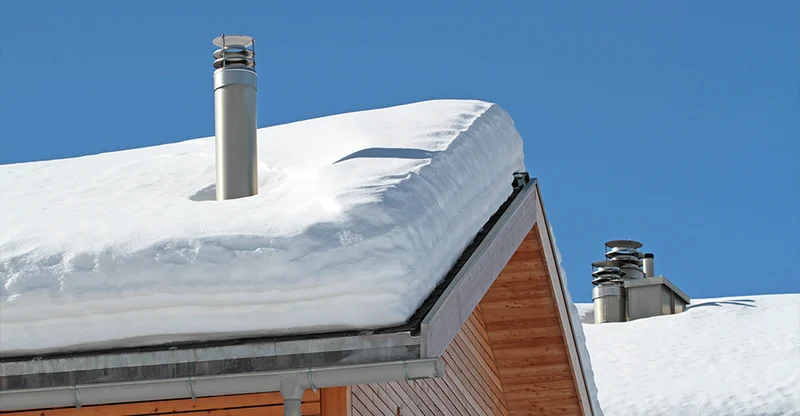
Snow load refers to the weight of accumulated snow and ice on a roof. In regions like Alaska, snow accumulation can become extremely heavy during winter storms, placing significant stress on the roof structure.
Unlike light, powdery snow, dense or wet snow can weigh much more. Over time, layers of snow and ice may build up, increasing the load placed on the roof. Without proper structural design, excessive snow weight can lead to roof damage or structural failure.
For this reason, building codes across Alaska include strict requirements for roof strength and snow load capacity.
Building Codes and Snow Load Requirements
Every municipality in Alaska follows building codes that establish minimum snow load requirements for residential structures. These requirements are based on historical weather data and typical snowfall patterns for each region.
Snow loads can vary depending on location. Areas that experience heavier snowfall require stronger roof structures and higher load capacity.
Local building departments determine the specific requirements for each area, and structural engineers typically incorporate these standards into the design process. Meeting these requirements ensures that a home can safely support expected snow loads during winter.
Roof Pitch: One of the Most Important Design Factors
Roof pitch refers to the steepness of a roof’s slope. In Alaska, roof pitch plays a major role in how snow accumulates and sheds.
Steeper Roofs
Steep roofs are common in cold climates because they allow snow to slide off more easily. This reduces the amount of snow weight that remains on the roof for long periods.
Benefits of steeper roof pitches include:
- Reduced snow accumulation
- Improved water drainage during melting periods
- Lower risk of ice dams forming along the roof edge
However, steep roofs can be more expensive to construct and may require additional safety measures during maintenance.
Moderate Roof Slopes
Some homes use moderate roof slopes that balance snow shedding with construction cost and design aesthetics. With proper structural support and insulation, these roofs can perform well in Alaska’s climate.
Flat or Low-Slope Roofs
Flat roofs are generally less common in regions with heavy snowfall. When used, they require extremely strong structural framing and careful snow management to prevent excessive accumulation.
Structural Framing and Roof Strength
 The framing system is the backbone of any roof structure. When designing a roof for heavy snow loads, engineers carefully calculate the strength needed to support accumulated weight.
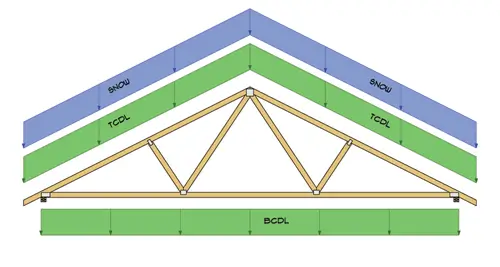
Typical structural components include:
- Roof trusses
- Rafters
- Load-bearing walls
- Support beams
Roof trusses are commonly used in modern construction because they distribute weight evenly across the structure. Proper spacing and reinforcement ensure that the roof can handle significant snow loads without bending or weakening over time.
Builders also use stronger framing materials and additional supports when constructing homes in areas with heavy snowfall.
Ice Dams and Their Impact on Roof Performance
Ice dams are another concern in cold climates. They form when heat escapes through the roof, causing snow to melt. The melted water flows downward until it reaches colder areas near the roof edge, where it refreezes.
Over time, this process creates a barrier of ice that prevents additional melting snow from draining properly. Water may back up under shingles, potentially leading to leaks and interior damage.
Preventing ice dams is a key part of effective snow load roof design in Alaska.
Strategies for reducing ice dam formation include:
- High-quality insulation
- Proper attic ventilation
- Continuous vapor barriers
- Air sealing around ceiling penetrations
By keeping the roof surface consistently cold, these measures reduce uneven melting and help prevent ice buildup.
Insulation and Energy Efficiency
Insulation plays an important role in both structural protection and energy efficiency. A well-insulated roof prevents heat from escaping through the attic and melting snow unevenly.
Cold-climate homes often use higher insulation values than homes in warmer regions. Advanced insulation systems help maintain consistent indoor temperatures while protecting the roof from heat loss.
In addition to improving comfort, proper insulation reduces heating costs and helps maintain the structural integrity of the roof.
Roof Ventilation in Cold Climates
Ventilation is another key element of cold-climate roof design. Without adequate airflow, warm air trapped in the attic can cause snow to melt unevenly, contributing to ice dam formation.
Effective ventilation systems allow cold air to circulate through the attic, maintaining a uniform roof temperature.
Common ventilation components include:
- Ridge vents along the roof peak
- Soffit vents near the eaves
- Attic ventilation channels
These features work together to regulate temperature and moisture levels within the attic space.
Roofing Materials for Snowy Climates
The materials used on the roof surface also affect how snow behaves.
Some roofing materials allow snow to slide off more easily, while others may hold snow in place longer.
Common roofing materials for Alaska homes include:
Metal Roofing
Metal roofs are popular in snowy climates because snow slides off easily. This reduces long-term snow accumulation and minimizes structural stress.
Metal roofs are also durable and resistant to moisture damage.
Asphalt Shingles
Asphalt shingles are widely used and cost-effective. While they may not shed snow as easily as metal roofing, proper roof pitch and insulation can still make them effective in cold climates.
Composite Roofing
Some homeowners choose composite materials designed for durability and weather resistance. These materials often offer a balance between performance and aesthetics.
Snow Retention Systems
In certain situations, homeowners install snow retention systems to control how snow slides off the roof.
These systems include small barriers or brackets that hold snow in place temporarily, allowing it to melt gradually rather than sliding off suddenly.
Snow guards can be especially helpful above entryways, walkways, or driveways where falling snow could pose safety risks.
Maintenance and Snow Removal
Even well-designed roofs may occasionally require snow removal during exceptionally heavy winters.
Professional snow removal services can safely remove excess snow from roofs when accumulation becomes extreme.
Homeowners should avoid climbing onto roofs themselves during winter, as icy conditions create significant safety hazards.
Regular inspections during spring and summer can also help identify potential roof issues before the next winter season begins.
Designing for Long-Term Durability
A properly designed roof should last for decades, even in Alaska’s harsh climate.
Long-term durability depends on several factors:
- Structural engineering
- Material selection
- Insulation and ventilation quality
- Professional construction practices
Working with experienced builders and engineers ensures that every aspect of the roof system is designed to withstand local weather conditions.
Why Early Planning Matters
Many homeowners begin thinking about roof design late in the planning process, but structural decisions should be made early.
Roof pitch, framing systems, insulation, and ventilation must all be coordinated during the design phase. Making changes later in construction can be expensive and difficult.
Discussing roof design with builders and engineers early ensures the home meets both safety requirements and energy efficiency goals.
Snow Load Roof Design in Alaska
Designing a home in Alaska requires careful attention to climate-specific challenges, and the roof is one of the most critical components. Understanding snow load roof design in Alaska helps homeowners make informed decisions that protect their investment and ensure long-term structural safety.
From choosing the right roof pitch to installing proper insulation and ventilation, every detail contributes to how well a home performs during winter. By planning ahead and working with experienced professionals, homeowners can create roofs that safely handle snow loads while maintaining comfort and efficiency.
A well-designed roof does more than keep snow out—it protects the entire home, ensuring that Alaska’s beautiful winters remain something to enjoy rather than worry about.
by alaskahome | Mar 17, 2026 | Uncategorized
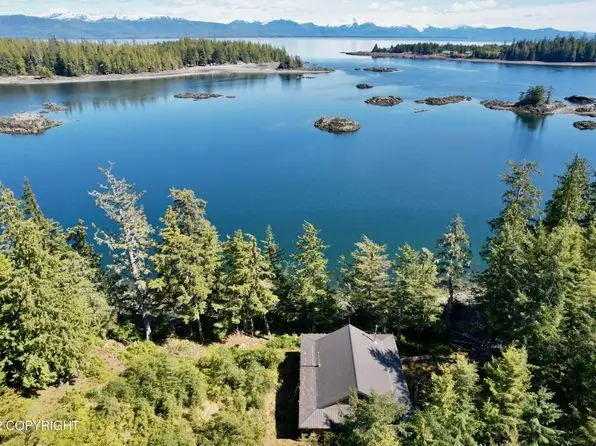
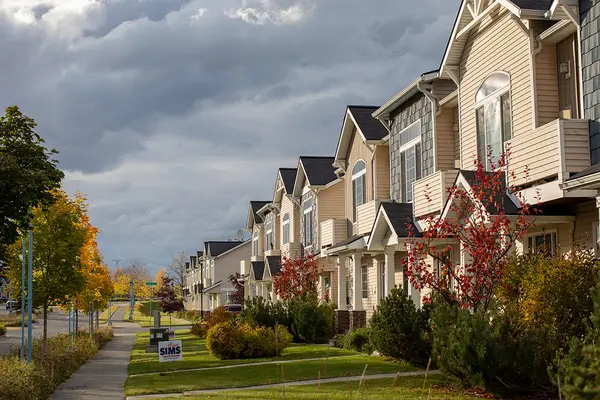
For many future homeowners, the first step toward building a custom home isn’t choosing a floor plan or selecting finishes — it’s finding the right land. If you’re considering buying land to build in Alaska, the property you select will significantly influence construction costs, timelines, design possibilities, and long-term value.
Alaska offers incredible opportunities for homebuilding. Wide-open landscapes, scenic views, and rural privacy attract buyers from across the country. However, purchasing land for construction in Alaska requires careful evaluation. Soil conditions, access roads, utilities, and environmental factors can all affect whether a property is truly suitable for building.
Before committing to a parcel, it’s important to understand what to look for and what questions to ask. This guide explains the most important considerations when buying land to build in Alaska, helping you make a confident and informed decision.
Why Land Selection Matters When Building a Home in Alaska
 Choosing land in Alaska is very different from buying a residential lot in a fully developed subdivision. Many parcels are rural or partially developed, meaning essential infrastructure may not yet exist.
The characteristics of your land will influence:
- Construction feasibility
- Foundation design
- Utility installation costs
- Road access and transportation
- Drainage and soil stability
- Long-term property value
A parcel that seems affordable at first glance may require significant preparation before construction can begin. Taking time to evaluate land carefully can prevent unexpected expenses later.
Location and Accessibility
One of the first things to consider when buying land to build in Alaska is location. Alaska is a vast state, and property accessibility varies greatly depending on where the land is located.
Proximity to Major Cities
Many people choose areas near larger communities such as:
- Anchorage
- Wasilla
- Palmer
- Fairbanks
These locations provide easier access to schools, healthcare, shopping, and employment opportunities. They also tend to have better infrastructure, which can simplify the building process.
Road Access
Before purchasing land, verify whether the property has legal road access. Some rural parcels require easements or shared access roads.
Poor road conditions can affect:
- Construction equipment delivery
- Winter accessibility
- Emergency services
- Property resale value
In Alaska’s winter climate, reliable road access becomes especially important.
Soil Conditions and Land Stability
Soil quality plays a major role in determining whether a parcel is suitable for construction.
Certain soil types require specialized foundation designs or additional engineering work. Before purchasing land, buyers should investigate the soil composition and stability.
Permafrost Considerations
In some regions of Alaska, permafrost may be present beneath the surface. Permafrost can shift as temperatures change, potentially affecting foundations.
Professional site evaluation can determine whether special construction methods are needed.
Drainage and Moisture
Good drainage is essential for long-term structural stability. Land that retains water or experiences seasonal flooding may require grading or drainage systems. Evaluating the slope and elevation of a property helps identify potential drainage issues.
Utility Availability
Utility access is one of the biggest factors affecting the cost of building a home in Alaska.
Some parcels may already have access to basic utilities, while others require independent systems.
Electricity
Many properties near established communities have access to electrical service. In more remote locations, extending electrical lines can add significant cost.
Some homeowners choose alternative power sources such as solar systems when building in rural areas.
Water Supply
In developed areas, municipal water systems may be available. However, many rural properties rely on private wells.
Well drilling costs can vary depending on soil conditions and water depth.
Septic Systems
Properties without municipal sewer connections require septic systems. Local regulations typically require soil testing to ensure the land can support a septic installation.
Septic design and installation should always be planned early in the building process.
Zoning and Land Use Regulations
Before purchasing land, buyers should confirm that the property is zoned for residential construction.
Zoning regulations determine:
- What type of structures can be built
- Minimum lot sizes
- Setback requirements
- Permitted land uses
In some areas, additional permits may be required for driveway access, environmental protection, or utility installations.
Understanding local regulations helps avoid delays during the construction approval process.
Topography and Landscape
The physical shape and features of a property can affect both design and construction costs.
Sloped Land
Hillside properties may offer stunning views but often require specialized foundation systems or retaining walls.
These factors can increase construction costs but may also enhance the property’s overall appeal.
Flat Land
Flat parcels are typically easier and less expensive to develop. However, drainage must still be evaluated carefully.
Vegetation and Clearing
Heavily wooded properties may require tree clearing before construction begins. Clearing costs vary depending on the density and size of vegetation.
Climate and Environmental Exposure
Alaska’s climate presents unique challenges for homebuilders.
When evaluating land, consider how environmental factors might affect construction and long-term living conditions.
Wind Exposure
Properties in open areas or elevated locations may experience stronger winds. Builders may need to incorporate structural reinforcements or specific roof designs.
Snow Accumulation
Snow load is a major design consideration in Alaska. The orientation of a home and the surrounding landscape can influence snow accumulation patterns.
Sunlight and Orientation
In northern regions, maximizing sunlight can improve both energy efficiency and indoor comfort. Homes designed to capture natural light often feel warmer and more inviting during long winters.
Property Boundaries and Surveys
Before completing a land purchase, buyers should obtain a professional property survey.
A survey confirms:
- Exact boundary lines
- Easements or shared access agreements
- Encroachments from neighboring properties
Understanding property boundaries ensures there are no surprises when construction begins.
Future Development in the Area
Another important consideration when buying land to build in Alaska is future development around the property.
Even remote areas can change over time as communities grow.
Consider factors such as:
- Planned infrastructure improvements
- Nearby housing developments
- Commercial expansion
- School construction
Future growth can increase property value, but it may also affect privacy and views.
Budget Considerations Beyond Land Price
The purchase price of a parcel is only part of the total cost of building a home.
Additional expenses may include:
- Land clearing
- Driveway installation
- Utility connections
- Soil testing
- Septic installation
- Well drilling
- Foundation preparation
These factors should be included when evaluating whether a property truly fits your budget.
Working With Professionals
Buying land for construction is much easier when working with experienced professionals.
Local experts can help evaluate whether a property is suitable for building and identify potential issues early.
Professionals who may assist include:
- Real estate agents familiar with land sales
- Home builders experienced in local construction conditions
- Engineers or soil specialists
- Surveyors and inspectors
Their expertise can help prevent costly mistakes and ensure the land supports your building goals.
When to Involve a Home Builder
Many buyers begin searching for land before speaking with a builder, but consulting a builder early in the process can be extremely helpful.
Experienced builders can:
- Evaluate whether land is buildable
- Estimate site preparation costs
- Recommend foundation designs
- Identify potential challenges
This guidance can save both time and money during the planning stage.
Buying Land to Build in Alaska
Finding the right parcel is one of the most important steps when planning a custom home. When buying land to build in Alaska, it’s essential to look beyond the price and carefully evaluate accessibility, utilities, soil conditions, and environmental factors.
The ideal property supports your design goals while minimizing unexpected construction challenges. With thoughtful planning, the right land can become the foundation for a comfortable, efficient, and beautiful home.
Taking time to research and consult local experts ensures that your building journey begins on solid ground — literally and financially.
by alaskahome | Feb 18, 2026 | Uncategorized
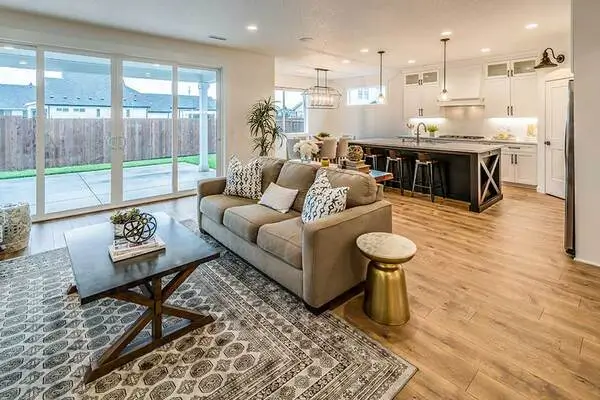
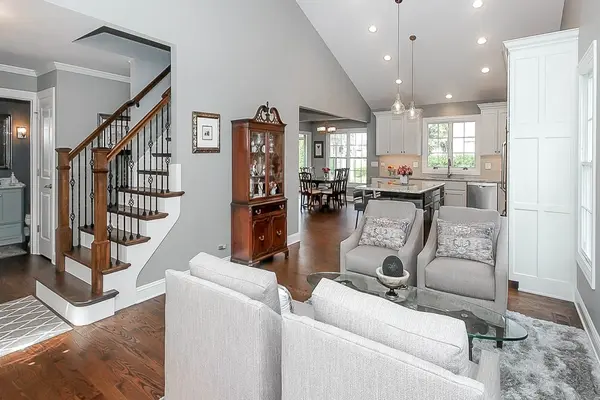
Designing a home in Alaska or any northern region requires more than choosing finishes and square footage. In cold climates, layout decisions directly affect energy efficiency, heating performance, comfort, and long-term operating costs. One of the most common questions homeowners ask during the design phase is whether open concept floor plans vs traditional layouts in cold climates perform differently — and which option truly works best.
The answer is not simply aesthetic. In regions where winters are long, temperatures drop well below freezing, and homes are occupied indoors for extended periods, floor plan design becomes a functional decision. This guide explores heating efficiency, insulation strategy, airflow, lifestyle considerations, resale value, and cost implications to help you make the right choice.
 Understanding Open Concept Floor Plans
Open concept floor plans remove interior walls between main living spaces. The kitchen, dining area, and living room flow into one large shared space. Vaulted ceilings, expansive windows, and centralized gathering areas are common features.
This style has grown in popularity over the past two decades because it offers:
- Increased natural light
- A sense of spaciousness
- Improved sightlines
- Modern design appeal
- Better social interaction
In milder climates, open layouts are often purely lifestyle-driven. In cold climates, however, they influence how heat circulates and how efficiently a home performs.
Understanding Traditional Layouts
Traditional floor plans divide spaces into separate rooms with walls and doors. Kitchens are enclosed or semi-enclosed. Living rooms and dining rooms are distinct areas. Hallways connect private and public spaces.
Benefits of traditional layouts include:
- Heat containment within smaller rooms
- Greater privacy
- Reduced sound transfer
- Zoned heating flexibility
In cold regions, the ability to close doors and isolate heated spaces can significantly influence energy performance.
Heating Efficiency: The Core Issue in Cold Climates
When evaluating open concept floor plans vs traditional layouts in cold climates, heating efficiency becomes the central concern. Heat naturally rises. In homes with high ceilings and large open areas, warm air can accumulate near the ceiling, leaving lower living areas cooler. This phenomenon can increase heating demand and create uneven comfort levels. Traditional layouts, with smaller enclosed rooms and standard ceiling heights, naturally retain heat more effectively. Rooms warm up faster and require less energy to maintain consistent temperatures. However, this does not mean open concept homes cannot perform well. Proper mechanical system design is the key difference-maker.
HVAC Design and Air Circulation
 Open layouts require intentional HVAC planning. Without proper system design, they may experience:
- Temperature stratification (hot upstairs, cool downstairs)
- Higher energy bills
- Longer heating cycles
Solutions include:
- Zoned heating systems
- Radiant floor heating
- Ceiling fans with winter reverse settings
- High-efficiency heat pumps
- Smart thermostats with room sensors
Radiant floor heating is particularly effective in open concept homes in cold climates. Because heat originates at floor level, it offsets natural upward heat movement and creates even warmth throughout the space. Traditional layouts benefit from simpler HVAC strategies. Smaller rooms allow for controlled airflow, and closing doors reduces unnecessary heat transfer.
Ceiling Height and Volume Considerations
Open concept homes often feature vaulted or cathedral ceilings. While visually appealing, increased air volume requires more energy to heat.
In cold climates, higher ceilings mean:
- More cubic footage to warm
- Increased heat rise and stratification
- Potentially higher energy consumption
If choosing an open layout with high ceilings, additional insulation and air sealing become critical. Builders often recommend:
- High R-value roof insulation
- Spray foam in key areas
- Heat recovery ventilators
- Enhanced vapor barriers
Traditional layouts typically use standard 8–9-foot ceilings, reducing overall heated air volume and improving efficiency by default.
Insulation and Building Envelope Performance
Regardless of layout choice, insulation quality ultimately determines performance. In Alaska and similar regions, homes require:
- Triple-pane windows
- Continuous exterior insulation
- Airtight building envelopes
- Advanced vapor control
Open layouts are more sensitive to envelope weaknesses because larger shared spaces amplify heat loss. If the building envelope is compromised, energy inefficiency becomes more noticeable. Traditional layouts can mask minor inefficiencies because heat is compartmentalized.
Air Infiltration and Arctic Entryways
Cold climate homes frequently incorporate mudrooms or Arctic entryways — enclosed vestibules that prevent cold air from entering directly into living spaces. Both open and traditional layouts benefit from these transitional spaces. However, in open floor plans, proper air separation at entry points is especially important. Without a buffer zone, cold air can spread quickly through the main living area. Well-designed entry systems significantly improve comfort and heating efficiency regardless of layout type.
Lifestyle During Long Winters
In northern regions, families spend substantial time indoors during the winter months. Layout decisions impact comfort beyond heating efficiency.
Open concept advantages during winter:
- Shared gathering space
- Better daylight distribution
- Increased social interaction
- Ideal for entertaining
Traditional layout advantages:
- Quiet, private areas
- Dedicated workspaces
- Reduced noise transfer
- Ability to retreat to separate rooms
For families with remote workers or school-age children, enclosed rooms may provide practical benefits during long indoor seasons.
Lighting and Psychological Comfort
Seasonal darkness plays a major role in cold climates. Open floor plans maximize natural light penetration. Fewer interior walls allow daylight from large windows to travel deeper into the home. Traditional layouts may require additional artificial lighting solutions, especially during short winter days. Psychologically, bright open spaces can feel uplifting during extended winter months. However, many homeowners also value cozy, enclosed rooms for warmth and relaxation.
Energy Costs Over Time
Energy efficiency is not solely determined by layout. It is determined by the combination of:
- HVAC system design
- Insulation quality
- Window performance
- Air sealing
- Ceiling height
- Building orientation
A well-engineered open concept home can perform as efficiently as a traditional layout if designed correctly. However, poor mechanical planning in an open home can result in higher heating bills. Traditional layouts naturally conserve heat but may lack the airflow benefits of centralized heating systems.
Sound, Privacy, and Acoustics
Extended winter occupancy increases awareness of sound transfer. Open layouts amplify:
- Kitchen noise
- Television sound
- Conversations
- HVAC cycling
Traditional layouts provide acoustic separation. Bedrooms and offices remain quieter, which can improve long-term livability.
Acoustic insulation can mitigate sound issues in open homes, but this adds cost.
Resale Value in Cold Climate Markets
Modern buyers often prefer open-concept homes. However, cold-climate buyers also prioritize energy efficiency and heating performance.
Resale value is more influenced by build quality than by layout category. Homes that demonstrate:
- Low energy bills
- Smart heating systems
- High insulation ratings
- Comfortable airflow
will perform strongly in resale markets.
Hybrid layouts — offering partial separation with optional sliding or pocket doors — are becoming increasingly popular because they provide flexibility.
Hybrid and Semi-Open Designs
Many modern cold-climate homes combine the best aspects of both layouts.
Features include:
- Partial walls between the kitchen and the living areas
- Flexible door systems
- Zoned heating
- Defined private wings
- Controlled ceiling height variations
These designs maintain openness while preserving energy control and privacy.
Cost Differences Between Layout Types
Construction costs may vary slightly depending on layout complexity.
Open concept homes often require:
- Larger structural beams
- Engineered supports
- Advanced HVAC zoning
- Enhanced insulation
Traditional layouts may require:
- Additional framing
- More drywall and doors
- Extra trim and finishing materials
The cost difference is typically moderate compared to overall build expenses. Long-term operating costs depend more on insulation and mechanical systems than wall placement.
What Truly Works Best?
When comparing open concept floor plans vs traditional layouts in cold climates, the best choice depends on:
- Heating system design
- Insulation performance
- Ceiling height strategy
- Family lifestyle
- Budget priorities
- Acoustic needs
If maximizing social space and natural light is a priority, open concept layouts can perform extremely well when engineered properly.If energy containment, privacy, and acoustic control are higher priorities, traditional layouts may feel more comfortable and practical.
Final Thoughts
In cold climates like Alaska, layout decisions must balance aesthetics with performance. Neither open concept nor traditional layouts are inherently superior. What matters most is thoughtful design, proper insulation, intelligent HVAC planning, and understanding how your family lives during long winter months. With expert planning, both styles can deliver warmth, comfort, efficiency, and long-term value. The key is aligning design with climate realities — not simply following trends.
by alaskahome | Feb 18, 2026 | Uncategorized
If you’re planning to build in Southcentral Alaska, one of the first and most important questions you’ll ask is: What is the cost to build a house in Wasilla vs Anchorage in 2026? While these two areas are geographically close, the total build cost can vary significantly depending on land prices, labor availability, utilities, permitting requirements, soil conditions, and lifestyle preferences.
In this comprehensive 2026 price breakdown, we’ll compare average per-square-foot costs, site work expenses, permitting differences, infrastructure access, and long-term value considerations to help you decide where building makes the most financial sense.
Average Cost Per Square Foot in 2026
In 2026, the average cost to build a house in Wasilla typically ranges between:
$240–$320 per square foot
In Anchorage, that range is generally:
$260–$350 per square foot
These numbers reflect mid-range custom homes with quality finishes, energy-efficient systems, and proper cold-climate construction standards. Luxury builds, complex lots, or high-end finishes can push costs significantly higher.
Why is Anchorage often more expensive?
- Higher labor demand and contractor scheduling pressure
- More complex permitting processes
- Stricter zoning in some neighborhoods
- Smaller lot sizes requiring precision site work
Wasilla, by contrast, often offers more land flexibility and slightly lower contractor overhead.
Land Costs: Wasilla vs Anchorage
Land is often the biggest variable.
In Wasilla:
- Larger lots are common
- Prices per acre are generally lower
- Rural parcels are widely available
In Anchorage:
- Limited land supply
- Smaller lot sizes
- Higher price per square foot
For example, in 2026, buildable residential lots in Wasilla may range from $45,000 to $120,000 depending on location and utilities. In Anchorage, lots often range from $90,000 to $200,000+.
However, lower land cost in Wasilla can be offset by additional infrastructure expenses (more on that below).
Site Preparation and Soil Conditions
 Both regions present unique soil challenges.
Wasilla and the Mat-Su Valley may require:
- Septic system installation
- Private wells
- Extensive grading
- Frost-protected foundations
Anchorage lots are more likely to have:
- Municipal sewer and water
- Established road access
- Engineered soil testing requirements
In rural Wasilla builds, septic systems alone can range from $15,000–$30,000. Well drilling may add another $10,000–$25,000 depending on depth.
Anchorage homeowners often avoid those costs but may face higher municipal connection fees.
Foundation and Structural Requirements
Cold-climate construction standards apply in both areas, but site-specific factors matter. Permafrost risk is typically lower in Wasilla than in certain Anchorage hillside zones. However, soil stability varies widely.
Common foundation types include:
- Insulated concrete slab-on-grade
- Crawlspace foundations
- Engineered footings for frost protection
Foundation costs typically range from $35,000–$70,000 depending on size and soil complexity.
Labor and Contractor Availability
Anchorage has a larger contractor base but also higher demand. During peak seasons, scheduling can be tight, which may affect timelines and pricing. Wasilla builders often operate with more flexibility but may charge travel premiums if materials must be transported from Anchorage. Labor accounts for a significant portion of overall build cost — often 35–50% of the total project.
Utility Infrastructure Differences
Utility access is one of the biggest differences in overall cost to build a house in Wasilla vs Anchorage.
Anchorage typically offers:
- Municipal water and sewer
- Established electric and gas lines
- Paved road access
Wasilla builds may require:
- Septic system
- Private well
- Propane tanks or alternative heating
- Driveway installation
While rural infrastructure adds upfront cost, monthly utility expenses may be lower long-term, depending on setup.
Energy Efficiency and Heating Costs
In 2026, energy efficiency is a top priority for Alaska builders.
Both areas require:
- High R-value insulation
- Triple-pane windows
- Advanced vapor barriers
- Efficient heating systems
However, Wasilla homeowners often have more flexibility to incorporate geothermal, solar, or off-grid enhancements.
Anchorage homes may benefit from proximity to natural gas lines, reducing fuel delivery logistics.
Energy system installation typically ranges from $25,000–$60,000 depending on complexity.
Permit and Zoning Differences
Anchorage permitting processes can be more detailed and time-intensive, particularly in hillside or established neighborhoods.
Wasilla permitting is often more streamlined, especially in rural zones, but septic and environmental approvals can extend timelines.
Permit costs may range:
- Anchorage: $4,000–$10,000+
- Wasilla: $2,500–$7,500
Timeline Considerations
Construction timelines in both areas typically range from 7 to 12 months, depending on size and complexity.
Weather plays a major role. Site prep in spring and early summer allows optimal building windows.
Anchorage may face tighter inspection scheduling due to higher volume.
Long-Term Property Value
Anchorage properties often retain stronger resale demand due to proximity to employment, schools, and amenities.
Wasilla homes attract buyers seeking land, privacy, and space — especially families and outdoor enthusiasts.
Appreciation trends remain steady in both regions, but location-specific demand influences resale speed.
Sample Cost Breakdown (2,400 sq ft Mid-Range Home)
Wasilla:
- Land: $75,000
- Site prep + utilities: $55,000
- Construction (2,400 sq ft @ $280): $672,000
- Permits/design: $12,000
Total: ~$814,000
Anchorage:
- Land: $140,000
- Site prep/utilities: $35,000
- Construction (2,400 sq ft @ $300): $720,000
- Permits/design: $18,000
Total: ~$913,000
These are generalized examples and vary by lot and finish level.
Which Location Is More Affordable?
Wasilla often offers lower land cost and greater lot size, but may require more infrastructure spending. Anchorage provides convenience and established services but typically comes with higher land prices. The true cost to build a house in Wasilla vs Anchorage depends on your priorities: space and flexibility versus proximity and infrastructure.
by alaskahome | Jan 15, 2026 | Uncategorized
When you’re building in Alaska, windows aren’t just a design feature — they’re a major part of your comfort, energy performance, and everyday quality of life. The right windows can fill your home with natural light during the darker months, keep drafts and cold spots out during long winters, and prevent moisture problems that cause fogging, mold, or even long-term damage. The wrong windows? They can make a brand-new home feel chilly, increase your heating bills, and leave you constantly battling condensation and ice buildup.
If you’re planning a custom build or comparing options with Alaska home builders, this guide will help you understand what actually matters when choosing windows for Alaska homes. We’ll cover the most important performance factors, how to maximize daylight without sacrificing warmth, and the real-world details that keep condensation under control. Because in a cold climate, the “best” window isn’t the one with the prettiest frame — it’s the one that performs flawlessly year after year.
Why Windows Matter More in Alaska Than Anywhere Else
 In many parts of the U.S., windows are often chosen based on looks and budget. In Alaska, windows affect far more than curb appeal. They influence:
- Heat retention and drafts
- Interior comfort near walls and seating areas
- Moisture control and indoor air quality
- Daylight and mood during darker seasons
- Long-term durability in extreme temperature shifts
The combination of cold temperatures, strong winds in many regions, and long heating seasons creates pressure on the entire building envelope. Windows are one of the most vulnerable parts of that envelope because glass is naturally less insulating than a framed wall. That’s why Alaska homeowners need to think about windows as a performance system, not an afterthought.
What “Good Window Performance” Really Means in Alaska
When people say they want “good windows,” they usually mean one of two things:
- They want their home to feel warm and comfortable near the windows
- They want their windows to stay clear and dry (no condensation or frost)
In Alaska, the best windows do both. They hold heat in and moisture out while still letting light in. To get that result, your window selection should focus on three performance priorities:
1) Insulation (cold-climate thermal performance)
A window should slow heat transfer as much as possible.
2) Airtightness (draft prevention)
Even a high-rated window can feel cold if air leaks around it.
3) Condensation resistance (moisture control)
A window can be “efficient” and still fog up if it’s not designed for cold climates.
The Window Ratings You Actually Need to Pay Attention To
When choosing windows for an Alaska home, you’ll run into a lot of numbers. Some matter more than others. Here are the most important ones, explained in plain language.
U-Factor (the most important rating in cold climates)
U-factor measures how well a window prevents heat from escaping. The lower the number, the better the window insulates.
For Alaska homes, you generally want a low U-factor because heating season is long and temperatures can be extreme. A better U-factor means:
- warmer glass surfaces
- less draft-like discomfort
- lower energy use
- improved condensation resistance
SHGC (Solar Heat Gain Coefficient)
SHGC measures how much solar heat comes through the glass.
In Alaska, this number matters because sunlight can be your friend — especially on south-facing walls. In some designs, you can intentionally use the sun to offset heating costs by choosing glass that allows more solar gain where it makes sense.
Air Leakage Rating
This is one of the most overlooked specs, and it matters a lot in Alaska. Air leakage measures how much air passes through the window assembly.
Lower air leakage = fewer drafts, less cold air infiltration, and better overall comfort.
Even the best glass package won’t save you if the window leaks air.
Visible Transmittance (VT)
VT tells you how much light the window lets in. A higher VT means a brighter interior — which is valuable in Alaska during long dark periods.
However, very high VT sometimes means less protective coatings, so it’s about balance.
Double Pane vs Triple Pane: What Alaska Buyers Should Choose
 One of the most common questions is whether triple-pane windows are “worth it” in Alaska. In many cases, yes — but it depends on the home design and your expectations.
Double-pane windows
Double-pane windows have two layers of glass with a sealed airspace between them. They’re common, widely available, and can perform well in moderate cold climates.
However, in Alaska, double-pane windows can still feel cold to the touch in winter, and they can be more prone to condensation depending on indoor humidity levels.
Triple-pane windows
Triple-pane windows add a third layer of glass, which increases insulation and helps keep the inner glass surface warmer.
Benefits of triple-pane windows in Alaska:
- better thermal performance and comfort
- less condensation risk
- less temperature swing near windows
- quieter interior (more sound reduction)
Triple-pane windows can cost more, but they often deliver noticeable comfort improvements—especially in homes with larger window areas, vaulted ceilings, or open layouts where drafts stand out more.
If your goal is long-term comfort in an Alaska build, triple-pane is typically the smarter choice.
Gas Fills and Coatings: The Quiet Features That Make a Big Difference
Many window buyers focus on frame color and style, but performance comes from what you can’t easily see.
Gas Fill (Argon or Krypton)
Windows are often filled with insulating gas between panes rather than just air.
- Argon is the most common and offers a good balance of performance and cost.
- Krypton can offer better performance in thinner spaces, but it tends to be more expensive.
Gas fills reduce heat transfer and help the interior pane stay warmer.
Low-E Coatings
Low-E is a thin coating on the glass that reflects heat. In cold climates, this coating helps keep heat inside during winter while still allowing daylight.
A well-chosen Low-E configuration can:
- reduce heat loss
- improve comfort
- limit UV fading on furniture
- help manage condensation by warming the interior surface
Low-E coatings are not all the same. Some are designed for more solar gain, others for more heat retention, and the right choice depends on window orientation and your design goals.
Condensation: Why It Happens and How to Prevent It in Alaska Homes
If you’ve lived in a cold climate, you’ve probably seen window condensation — foggy glass, water droplets, or even frost at the bottom of the window. It’s frustrating, and it’s one of the top complaints in winter.
Condensation happens when warm, moist indoor air meets a cold surface. When the glass surface temperature drops below the dew point, moisture forms.
In Alaska, condensation is common because:
- indoor air is warm and humid (from showers, cooking, laundry, breathing)
- outdoor air is extremely cold
- glass surfaces can become very cold, especially with lower-quality windows
Why is condensation more than just annoying
Condensation isn’t only a visibility issue. If it’s consistent, it can lead to:
- water damage around sills and trim
- peeling paint or stained wood
- mold growth in window frames
- long-term rot if moisture gets trapped
How to reduce condensation risk
The best approach is a combination of window performance and home systems:
Choose windows with better thermal performance
Triple-pane, low U-factor windows keep the interior pane warmer, which reduces condensation risk.
Improve ventilation
A well-designed ventilation system helps remove moisture from the indoor air instead of letting it linger.
Manage indoor humidity
In winter, many homeowners unknowingly keep humidity levels too high. It feels nice for skin and comfort, but it can increase condensation.
Ensure airtight installation
Air leakage around the window frame can bring cold air into contact with interior surfaces, making condensation worse.
Window Frames in Alaska: Vinyl, Fiberglass, Wood, or Aluminum-Clad?
The frame matters more than many buyers realize, because it affects durability, maintenance, insulation, and how stable the window remains over time.
Vinyl
Vinyl windows are common and budget-friendly. They can perform well, but quality varies widely.
Best for:
- value-focused builds
- smaller window sizes
- homeowners who want low maintenance
Potential downside in Alaska:
- lower-end vinyl can feel less rigid in extreme cold and over time
- color choices may be more limited
Fiberglass
Fiberglass windows are known for strength and stability. They tend to handle extreme temperature swings better and remain more rigid over time.
Best for:
- larger windows and expansive glass
- cold-climate durability
- long-term performance builds
Wood (often with exterior cladding)
Wood interiors offer a warm, high-end look. Many are protected externally with aluminum cladding.
Best for:
- premium custom homes
- architectural style projects
homeowners who love natural interiors
Consideration:
- wood requires more care and attention long-term
- higher cost is common
Aluminum (and aluminum-clad)
Pure aluminum frames conduct heat easily, which can be a disadvantage in cold climates. However, modern aluminum-clad designs often pair aluminum exteriors with insulated interiors for better performance.
Best for:
- modern architecture
- durability against the elements
- higher-end builds with proper thermal breaks
Window Orientation: The Key to Daylight Without Losing Heat
In Alaska, daylight is valuable. But maximizing light doesn’t mean “add more windows everywhere.” It means smart placement and sizing.
Here’s how to think about orientation:
South-facing windows (your daylight advantage)
South-facing windows can bring in more consistent light and potentially solar warmth. Many Alaskans intentionally place larger windows on the south side to improve brightness and comfort.
North-facing windows (soft light, higher heat loss)
North-facing windows bring in cooler, softer light but don’t offer solar heat gain. In cold climates, these windows are more likely to feel chilly and may be better kept smaller.
East-facing windows (morning light)
Great for kitchens and breakfast areas if you love bright mornings.
West-facing windows (afternoon light + glare risk)
West windows can be gorgeous at sunset, but they can also create glare and overheating on sunny days, even in cool climates.
A balanced design uses larger window areas where the light and solar gain help, and smaller windows where heat loss outweighs benefits.
Bigger Windows vs Better Windows: What’s Smarter in Alaska?
Modern homes often feature big glass walls and tall window designs. They look beautiful and feel open—but in Alaska, the glass area needs to be handled strategically.
If you want larger windows, the key is to upgrade performance so the home stays comfortable.
When large windows make sense:
- the view is a major part of the home’s value
- you want maximum daylight in the main living spaces
- the window orientation supports it (often south-facing)
What you should do if you go big:
- choose triple-pane glass
- prioritize low air leakage rating
- upgrade installation and sealing details
- consider window coverings for nighttime insulation
A well-designed Alaska home can absolutely have large windows—without turning into a cold, drafty space. You just need the right window package.
Installation Matters as Much as the Window Itself
This is the part many homeowners don’t realize: you can buy excellent windows and still end up uncomfortable if installation quality is poor.
A window should be installed as a complete air-and-water management system. If the sealing, flashing, and insulation around the window aren’t handled correctly, you can get:
- drafts and cold spots
- moisture intrusion
- condensation issues
- reduced performance, even with high-end glass
In Alaska, this matters even more because temperature differences create pressure and moisture movement. Proper installation protects the home long-term.
The Best Window Features for Alaska Home Comfort
If you want a quick checklist of what most Alaska homeowners benefit from, here’s the simple “smart window package” idea:
✅ Triple-pane glass for comfort and condensation resistance
✅ Low U-factor for better thermal performance
✅ Low air leakage rating to prevent drafts
✅ Cold-climate Low-E coating choices
✅ Argon gas fill (or high-performance equivalent)
✅ Strong frame material (fiberglass or high-quality vinyl often performs well)
✅ Professional installation with airtight sealing and flashing
It’s not about choosing the most expensive option—it’s about choosing the right combination of performance and durability.
Windows Should Make Your Alaska Home Feel Better Every Day
The best windows for Alaska homes aren’t just about saving energy — they’re about how your home feels to live in. Warmer indoor comfort, fewer drafts, clearer glass, less condensation, and brighter natural light all add up to a home that feels calm, cozy, and easy to maintain. When you make window decisions early and strategically, you avoid the costly regrets that come from picking based only on looks or price.
If you’re planning a custom build and want a home designed for Alaska’s climate from the ground up, window selection is one of the smartest places to invest. It’s one of those decisions that pays you back every single winter—quietly, consistently, and comfortably.
by alaskahome | Jan 15, 2026 | Uncategorized
Building a home in Alaska comes with a different set of priorities than most places in the U.S. It’s not just about the floor plan, the view, or the finishes—it’s about making sure your property works year-round in real conditions. And if you’re building outside of city limits or in a more remote area, one of the biggest “must-plan” systems isn’t the kitchen or the heating… It’s your wastewater setup.
For many rural properties, a septic system in Alaska isn’t optional—it’s the default. But it’s also one of the most misunderstood parts of building a home. A septic system is not something you want to treat like a last-minute add-on, because your soil, lot layout, access, and even your home design can impact what’s possible and what it will cost to build correctly.
This guide breaks down what homeowners need to know before building on rural land: how septic systems work, what affects feasibility, what to consider during site planning, and how to avoid issues that lead to expensive corrections later. If you want a home that feels easy to live in—not a home that requires constant troubleshooting—your septic plan should be handled early and correctly.
Why Septic Planning Is a Big Deal in Alaska
 In many states, septic systems are relatively predictable. In Alaska, they can vary widely depending on the property location, ground conditions, and weather patterns. That’s why you’ll see huge differences between one build and another, even if the home size is similar.
Septic matters because it impacts:
- Where can you place your house on the lot
- Whether the lot is even buildable
- How much excavation and prep is needed
- Long-term reliability during freeze/thaw cycles
- Future resale confidence (buyers ask about septic condition more than you’d expect)
Most importantly, if septic is installed incorrectly, the “fix” can be disruptive, expensive, and stressful. Planning it properly is far easier than repairing it after construction.
How a Septic System Works (Simple Breakdown)
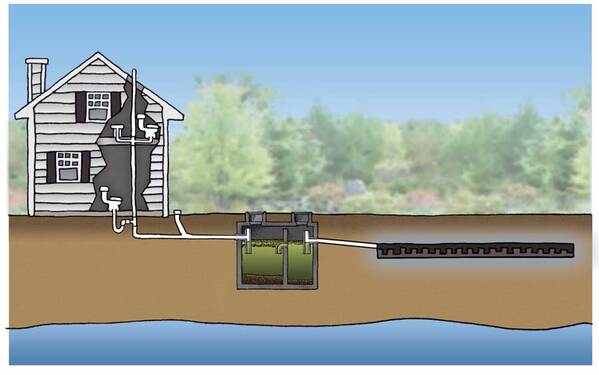
A septic system is a self-contained wastewater treatment setup used when there’s no access to municipal sewer.
Here’s the basic flow:
- Wastewater leaves your home through the main drain line.
- It enters the septic tank, where solids settle at the bottom and oils rise to the top.
- The remaining liquid (effluent) flows into a drainfield / leach field, where it filters into the soil and is naturally treated.
- The soil absorbs and cleans the effluent over time.
In other words, your septic system depends heavily on the soil doing its job. That’s why site conditions matter so much when building in Alaska.
Septic vs Sewer: How to Know What You’re Working With
Before you fall in love with rural land, confirm whether the property is connected to a sewer system. In many cases, rural lots won’t have sewer access, which means septic becomes part of your home’s required infrastructure.
If sewer is available nearby, it may still not be connected to the property—so you’ll want to verify:
- Is there an existing sewer line connection?
- Is it at the street, or do you need to extend it?
- Are there any connection fees?
- Are there timing restrictions for connecting?
If sewer isn’t available, then septic planning is non-negotiable.
Why Soil and Site Conditions Control Everything
The biggest factor in whether a septic system will work well is the soil’s ability to absorb and filter wastewater. On rural Alaska properties, soil conditions can vary dramatically even within the same area.
Common factors that affect septic viability include:
Soil Drainage
Some soils drain well; others hold water. Poor drainage can lead to slow absorption and system stress.
Water Table Level
If groundwater is too close to the surface, it can limit how deep a drainfield can be placed.
Lot Slope
A slope can be helpful or harmful depending on how it’s managed. Drainage patterns matter a lot.
Seasonal Freeze/Thaw
Alaska’s climate can create freeze risks and shifting ground conditions, especially when systems aren’t properly protected.
If you’re serious about building, don’t assume a septic system will automatically be easy. You want the lot evaluated early so you know what’s feasible.
The Biggest Mistake: Picking a House Plan Before the Septic Layout
 This happens all the time. Buyers choose a home design first, then try to fit septic in later. But septic needs space, placement strategy, and long-term access.
Your septic layout affects:
- House placement
- Driveway positioning
- Garage orientation
- Future additions or outbuildings
- Tree placement and landscaping
- Property drainage design
That’s why smart builders treat septic as part of the overall site plan—not a separate decision.
Ideal approach: plan septic and driveway access first, then position the home for the best layout, sunlight, and views.
Where Septic Systems Usually Go Wrong (And How to Avoid It)
Septic failure isn’t always dramatic. Sometimes it starts as “minor issues” that grow into expensive problems later. Here are the common causes:
1) Poor system sizing
A septic tank and drainfield must match the home’s expected usage. A home built for a family needs a different setup than a cabin used seasonally.
2) Bad placement
Septic components need correct spacing from wells, property lines, and the home itself. Placement should also support future maintenance access.
3) Improper drainage management
A septic system can be stressed if surface water flows toward it or pools near the drainfield.
4) Lack of long-term access
If the tank is placed where it’s hard to reach, servicing becomes harder and more costly.
5) Landscaping mistakes
Planting trees too close or driving heavy vehicles over the drainfield can cause damage.
Septic works best when it’s treated like a system you’ll maintain—not a buried object you forget exists.
Septic Tank Size: What Homeowners Should Understand
While exact sizing depends on design standards and local requirements, the main point is this:
Septic sizing is typically based on:
- number of bedrooms
- expected daily water use
- whether the home will be occupied full-time
- number of bathrooms and fixtures
Even if your home is “just two people,” a 4-bedroom home is still designed for higher potential usage—which affects sizing assumptions.
Pro tip: Always plan septic based on the home’s design capacity, not just your current lifestyle.
That protects you long-term and helps resale.
Drainfields in Alaska: Why They Need Extra Attention
The drainfield is the part of the system that requires the most careful planning, because it’s where wastewater gets treated naturally.
Drainfield performance depends on:
- soil absorption
- depth and layering
- drainage direction
- long-term moisture management
- proper installation
In Alaska’s climate, drainfields need to handle seasonal shifts. The goal is a system that stays stable, drains reliably, and doesn’t freeze or saturate under real-world conditions.
Access, Maintenance, and Winter Reality
A septic system isn’t something you “install and forget.” Proper maintenance keeps it healthy and prevents backups or long-term damage.
Homeowners should plan for:
- pump access (tank must be serviceable)
- clear marking of tank location
- winter access strategy if servicing is ever needed
- responsible water use habits
- regular maintenance schedule based on household size
One of the most overlooked details in Alaska builds is winter practicality. You want everything—from access routes to service points—to be manageable even when conditions aren’t perfect.
Septic and Well Together: The Spacing Matters
Many rural Alaska homes use both septic systems and private wells. If your property will have a well, you must plan septic placement carefully to protect water quality.
Your well placement affects:
- where septic can go
- how the lot is oriented
- how drainage should be handled
- where future expansions are possible
This is why site planning is so important. The lot needs to work as a complete system, not just as a blank piece of land.
Seasonal Use vs Full-Time Living: Your Septic Needs Might Change
Some Alaska homeowners build cabins, weekend homes, or seasonal properties. Septic planning should match how the home will truly be used.
For seasonal homes, septic considerations include:
- periods of low use
- winterization strategy if not occupied
- water usage spikes during holidays or visits
- maintenance timing
For full-time homes, the system should be designed for reliable daily use with long-term durability.
The key is to be honest about how you’ll live in the home—because septic is designed around real usage patterns.
What to Ask Before Buying Rural Land in Alaska
If you’re still in the land-buying phase, these questions can save you from choosing a lot that becomes a headache later.
Ask:
- Has the property ever had a septic system before?
- Is there an existing system or tank on site?
- Has the soil been tested for septic feasibility?
- Is there a clear area suitable for a drainfield?
- Are there drainage issues on the lot?
- Where would the well be placed (if needed)?
- Are there any limitations on building placement?
Even if the property looks perfect, septic feasibility should be confirmed early.
Practical Tips for a Smooth Septic Build Plan
Here’s what typically makes septic planning easier and more successful:
✅ Plan septic early in the build process
✅ Choose home placement based on site conditions, not only the view
✅ Keep service access in mind (you will need it later)
✅ Manage surface drainage so water doesn’t collect near the drainfield
✅ Avoid building driveways or parking over septic areas
✅ Think long-term: future additions, garage expansions, outbuildings
The best septic system is the one you barely think about because it simply works.
Signs of Septic Issues (What Owners Should Watch For Later)
If you already own a septic home or buy a property with an existing system, it helps to know the early warning signs of problems.
Watch for:
- slow drains throughout the home
- sewage odors inside or outside
- unusually green grass patches above the drainfield
- soggy ground near septic areas
- gurgling pipes
- backups in lower-level drains
Catching problems early is always easier than letting them build up.
Septic Is One of the Most Important “Invisible” Parts of Your Alaska Home
A septic system isn’t exciting, but it has a huge impact on your home’s comfort, value, and long-term stress level. In Alaska, septic success depends on smart planning, proper placement, and building for real conditions—not best-case scenarios.
If you’re building on rural land, don’t treat septic as paperwork. Treat it as a core part of your home’s foundation planning. When it’s done right, you’ll never have to think about it. When it’s ignored, it can become the one issue that overshadows everything else.
If you’re planning a new build and want a home that’s designed to perform beautifully in Alaska from day one, a strong septic plan is one of the smartest steps you can take early.